Tuesday 31 July 2007

A New Start?

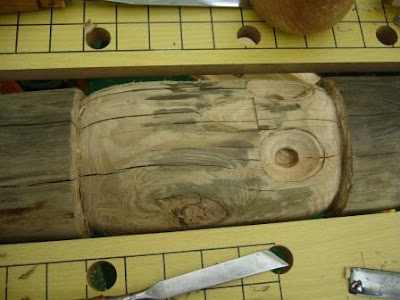
Today I found a length of Idigbo which I decided would satisfy the requirement. It is not quite as long as the original, but I decided that it could be mounted on some sort of plinth, which would lift it off the ground.


Idigbo is a yellowish hardwood from the Idigbo Tree (Terminalia Ivorensis), native to the west coast of Africa. It has a rather interlocked grain. This does mean some difficulties with the direction of cut. The wood contains a dye which may stain other materials when wet; it also contains tannin which causes staining when in contact with iron under moist conditions. We must take this into account when planning the mounting etc.

I have calculated the size and separation of the animals.

1 hour

Sunday 29 July 2007

The Pole at Titchfield

Today I took the pole to Titchfield where I was demonstrating with the Solent Guild at the Fareham Model Engineers open day.

I worked on the beaver for a while but as I started to put in more of the detail it became apparent that because of the dry cracked nature of the surface, it was going to be very difficult to stop it breaking up as I carved it. Other members of the Guild also thought that it was going to be unlikely that a decent finish would be possible.


Also I realized that two faults which I had originally thought to be surface damage, were in fact caused by large embedded nails.


I decided to find an alternative which would be more satisfactory.

2.5 Hours

Wednesday 25 July 2007

Starting the Beaver

I decided to start on one of the more complicated animals today. The beaver is very stylized on Totems. They are characterized by their two long front teeth and they are always holding a stick. The children had depicted this in paint but I had to think how to carve it.

I found this picture of a Totem Beaver, and decided to base my work on it.


I blew the picture up to the size needed and then copied the basic shapes freehand onto the surface. This surface will definitely cause problems if I try to put in very much fine detail, so providing the basic shapes are there, the detail may have to be painted.

I started on the eyes and nose because they are the parts that 'fix' other details.
This is as far as I got today:


Approx 1.5 hours

Sunday 22 July 2007

Continuing the Owl

More or less completed shaping the Owl today.

Continued with the rounding, top and bottom, taking it around most of the back.

I decided rather than just painting on the beak, it would be preferable to add a sculpted beak, so I flattened the shape on the front of the pole so that the beak can be fixed on later.

At the end of the day, the Owl looked like this:


Approx 1 hour

Friday 20 July 2007

Owl Shaping

Having got the pole now installed in my home work area, my conservatory, I had to decide where to start the figure shaping. I had noticed that some of the surface is rather unstable due to weathering and splitting, so decided to start on the simplest shape - the Snowy Owl.

At the school I had showed some of the children how to find the best part of the pole to be the front face, and had marked all down this with a pencil. In fact we had also marked the eyes or the Owl and I had demonstrated how these were hollowed.

Today I continued to take these out and deepened the pupils. I then started rounding the owl's shape, deepening the dividing incisions as the rounding got deeper.

Approx 2 hours.

Wednesday 18 July 2007

Second School Visit

For my second visit to the school, I took just the few tools that I thought we would need to complete the initial carving. I set the post up as before and got the children to complete the initial incisions that we had started the week before.

Here is one 'apprentice' hard at work:


I then took individual pictures of parts of the original pole so that I could work on carving them at home.


Friday 13 July 2007

The Original Painted Pole

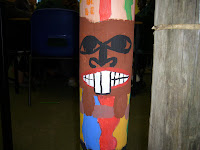
This is a picture of the original Totem Pole designed and painted by the children.

It tells their own story based on some of the traditional animals depicted in North American Totem poles. At the bottom is a Bear, then a Beaver, above which is a Snowy Owl. The whole being topped by a Parrot.

The basis is a garden post with added 'wings'. It was painted with poster paints and sealed.
Posted by Picasa

Thursday 12 July 2007

First School Visit

I spent a couple of hours at the school this afternoon. There are about 25 children in the class, aged between 9 and 11. I was shown the Totem Pole they had painted and they told me the story that it depicted. We talked a little about the different types of Totems and where they came from. It was obvious that they had done considerable background work on the subject.

I then showed them some of the tools of the carver's trade, the gouges, chisels, mallets, etc. and described how they are used.

I got some of them to have a go at cutting a few pieces of scrap wood, but fairly soon we decided that it would be nice if we could start on the actual pole itself. This is a garden post 1300mm long and 115mm in diameter. It is a fairly rough weathered pine post with several knots and quite a lot of surface splitting.

I decided that we could incise a separator line between each of the four animals, so having got some of the children to compare the new post with their painted pole we pencil marked where the cuts should be.

I mounted the post on a sturdy table, using a 'Jobber' and a cramp. Although this was a bit low for me, it was a suitable height for the children.

Each child successfully carved a small section of the encircling incisions needed, using a large flat (No 3) Gouge and a mallet. Meanwhile the rest of the children did some modeling of the animals in plasticine.

The first incisions:

Posted by Picasa


At the end of the session I agreed with the teacher that it would be nice if we could carry on with the project. I agreed to come into the school again the following week, and then to continue working on the pole during the summer break, with the intention to have it finished in time for the School's centenary in October.