Thursday, 24 January 2008
The Owl's Beak and Final Touches
I decided to use a darker wood to give a little contrast to the otherwise somewhat smooth and undecorated Owl.
A piece of rather hard dark red wood, possibly a variety of Mahogany, was found and the beak shaped on the end.
A tenon was shaped and then the small piece cut off.
A suitable 'slot' (mortice) was cut into the front of the Owl's face and the Beak fitted quite tightly. A small dab of wood glue holds it firm.
The Owl being finished, the only remaining task was to fix the Parrott's wings.
Wood glue liberally applied to the inserts and these then pushed into the slots in the body made a tight fit which should last.
So now we have a couple of shots of the completed pole.
Now all that remains is to give the whole piece another coat of sealant after rubbing carefully with grade 0000 wire wool to get rid of the 'nibbies'!
Approx 1 hour per coat of sealant and 1 hour to shape and fix the beak.
Sunday, 20 January 2008
Main Carving Finished
The wood of the wings was not quite as dense as that of the main pole, so tended to flake a bit. As the wings are feathered this doesn't really detract from the effect.
Parrots have strong claws on Totem Poles so I followed suit. The rather oddly shaped legs seems also to be traditional as I mentioned earlier.
The wings were attached to the body by leaving about a centimeter of squared off wood at the end and then cutting a mortise into the body so that this fitted tightly. Once this was completed the carving on the wing was worked on so that the join was as natural as possible.
The beak was undercut significantly as in the Stanley Park example.
The Owl needs a beak, but that's the main carving finished ... It remains to clean up a few of the surfaces with abrasives where he grain has caused difficulties with the gouges, and then sealing the surface.
Appox 12.5 hours
The main carving has therefore taken a bit over 90 hours, with about 6 hours in the setup, working with the school and researching.
Saturday, 12 January 2008
Parrot's Wings
I scaled the wing design from the Stanley Park Pole seen in a previous blog. Conveniently it fitted onto one page of A4. I traced the outline onto the board and cut around it with a band saw. I then reversed the cut out piece, drew around it on the remaining piece of board and cut out the other wing.
With work like this, which will have exposed edges, I find it best to work from the centre outwards. So the centre curved line is witnessed first and the scalloped cuts of the upper feathers cut in to it, gradually deepening. Only when the upper surface of these feathers are as I want them do I cut their edges and then start surfacing the lower feathers, gradually approaching the bottom edges.
Having done both rows of feathers, I shaped the upper wing design which has the 'eye' in the centre.
On this photo you can see one wing completed and the other after about 1.5 hours work.
The upper feathers completed and the second row in progress.
As can be seen on the completed wing I have 'feathered' the whole wing by cutting back the underside to give it a certain delicacy and lightness. This was mainly done withe wing face down on an anti-slip cloth.
Approx 7.5 Hours
Wednesday, 2 January 2008
The Parrot
I intended at first to base my figure on a true parrot, but any examples I found looked very different from the real thing. So, because of the very iconic nature of the Totem Pole I decided to base the design on the icons I could find on actual totems.
The principal model was in Stanley Park, Vancouver.
The strange thing about these bird images is that they usually have legs and thighs more like a ground animal rather than a bird, and I decided to go with this feel.
The top of the head has been particularly difficult to smooth because of the cross-grain cutting of a rather hard tough grained wood.
The eyes and feet will now be defined the eyes etc.
I will be adding 'add-on' wings later.
Approx 12.5 Hours
Sunday, 23 December 2007
The Snowy owl
The Snowy Owl has been the object of attention over the last couple of weeks.
I decided to give it a smooth coat, and this has been quite a challenge given the nature of the interlocked grain. So having got the surface as smooth as I could with very sharp gouges, I resorted to medium grit garnet paper to get rid of the odd blemishes.
Of course a beak is going to have to be added, and i still have to prepare the wood for that!
Approx 12 hours
Wednesday, 28 November 2007
Owl Started
Over the last couple of weeks I've managed to find the time to finish the Beaver.
There were several options when it came to the eyes, but in the end I chose a fairly tight and deep design, which I've seen used on several totems.
I decided to leave the platform that separates the figures until I finish all the creatures, and do the final cuts.
So now I've started on the Snowy Owl ....going above the Beaver ....
... Lots of examples here, so I've chosen a fairly simple version which will fit with the story quite well.
The picture on the right is the total so far. Above all this will go the Parrot!
Approx 8 hrs
Saturday, 15 September 2007
The Beaver matures
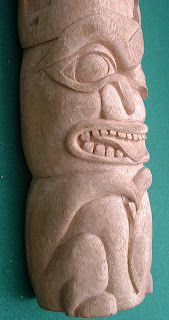
The photo shows that the shaping of the Beaver is now mostly complete, as is some of the finishing. Just the legs, ears and eyes to do.
Today I took the pole to the Portsmouth Grammar School where the Guild meet every couple of weeks to have a "carve-in". The school workshop is used by about 20 Guild members, each working on their own project.
Approx 11 hours
Sunday, 26 August 2007
Starting the Beaver at Marwell
The Beaver was measured out and aligned so that initial roughing cuts could be made in the right place. The tip of the nose is one of the high spots so I relieved that and then found the contours of the eyebrows.
The next high point is the bottom of the two front teeth so it was quite easy to shape them down into the mouth, and this enabled the contours of the mouth to be set.
The two rounds each side of the nose are not eyes! But they are rather stylized whiskers.
Approx 3.5 hours
Tuesday, 14 August 2007
The Bear is Done!
As can be see from both these photos, the surfaces tend to get fairly dirty looking. This is mostly because the wood tends to stain the hands while working, rather like oak does. This can easily get transferred back to the surfaces. Luckily these can be cleaned with Methylated Spirit.
Some of the surfaces may need a bit more refining and smoothing, but this will be better done after all the other subjects are brought to the same level.
The next job will be to plan and rough out the shape of the Beaver. But other priorities will mean little progress here for a week or so.
Approx 7 hours (so about 25 hours total on the Bear)
Thursday, 9 August 2007
The Bear's Left side
It became obvious that the rest of the left side of the bear should be shaped so as to solve some of the lines and contours coming round fom the front.
I did not have an exact prototype for the side of the bear, but remembered seeing several in Canada which, similar to the Beaver, showed the animal sitting on its haunches. The head is normally of a much larger scale than the body. I took the shaping up to the crown, but not above it as I haven't yet decided what the boundary between the Bear and Beaver will look like.
The surfaces were smoothed as much as possible. In some areas this was frustratingly difficult due to the close interlocking of the grain.When I got it to this stage, I decided it was time to start on the other side in case this threw up any inconsistencies which needed adjustments on the first side.
7.25 Hours